Recently I read a Marathi translated version of a novel called 'Aavarana(2007)'. The book has been originally written in Kannada by the bestselling novelist Professor S.L.Bhyrappa and translated in Marathi by Uma Kulkarni. The novel portrays the relationship between Hinduism and Islam - in the past and in the present, with two stories going on a parallel track.
The term 'Aavarana' is used in Vedantic literature to denote that aspect of nescience (Avidya) that obscures all things. It is the 'Avidya' that hides the real truth behind its covers. Prof. SL Bhyrappa chose the same name to his novel because he wanted to highlight the current so called Secular and Social faces in India who are trying to hide the real truth with the help of political support.
The book is very informative as the author has actually referred to many books himself before writing this novel. This list can be found at the end of the book nicely included as a part of the story. The incidents that he has narrated by means of a story are based on these references. The author has made very clear that the relationships between communities should be based on a strong foundation of truth rather than systemic misinformation. To be frank, today's education about the Indian history lacks the truth.
One should definitely read this book and have an introspection about what we have been taught since childhood and what is the actual truth. Certainly, no one should feel against Islam or any other religion, that is not the book's intent as clearly stated by the author. The intent is to understand that no relationship can stand successful if it is not based on a strong foundation of truth. Because truth will never die!
Tuesday, February 21, 2012
Tuesday, February 14, 2012
Wah! Guru
Last Sunday, I watched an excellent Marathi drama called 'Wah! Guru'. My favorite actor Dilip Prabhawalkar performed excellent in casting the character of Professor Sapre. The drama is based on Mitch Albom's best-selling novel 'Tuesdays with Morrie - an old man, a young man, and life's greatest lesson'.
It is a story of courage and optimism of Professor Sapre who is diagnosed with the terminal illness of Motor Neuron Disease (MND), a very rare disease due to which the patient loses his muscular control and finally succumbs to it. But Prof. Sapre asks himself - Do I wither up, or do I make the best of my time left?
He makes Death as his final project. Since everyone is going to die, his death can be taught in personal class, that's what he thinks. He starts teaching the bridge between life and death to one of his students by narrating small inspirational stories. And the student actually benefits from his teachings, his positive attitude.
I liked this dialog - 'When you're in bed, you're dead!'
And also this conversation between the student and the professor:-
Student : "Why should we care or think about death now as it approaches towards end of our life ?"
Professor : "My thinking is opposite. The life ends when death approaches us. And hence we need to think of Death every day."
The ebook is available @TuesdaysWithMorrie
So, please watch this wonderful drama or read the book if you haven't already ! Needless to say that my next plan is to read this book ! :-)
Saturday, February 11, 2012
Making Gedit look like Textmate for Ubuntu
Textmate is the most popular editor tool available exclusively only for Mac OS. Developers love it due to its simplicity, lightweightness and excellent feature set availability. While working on Ubuntu (11.10 64-bit), we have the default gedit editor available which is also very good. However, if we want to have some Textmate like features with gedit, we can follow these simple steps to make gedit look like Textmate:-
(1) Installing extra gedit plugins :-
$ sudo apt-get install gedit-plugins
(2) Installing Textmate 'Monaco' font
Download from http://www.gringod.com/wp-upload/software/Fonts/Monaco_Linux.ttf and execute below commands:
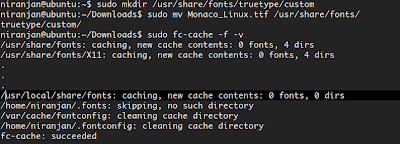
(3) Installing syntax color scheme darkmate.xml
Download the darkmate.xml file from http://grigio.org/files/darkmate.xml
From gedit, go to Edit -> Preferences -> Font & Colors. Then click Add button and locate the download file(darkmate.xml). Also select the Monaco font.
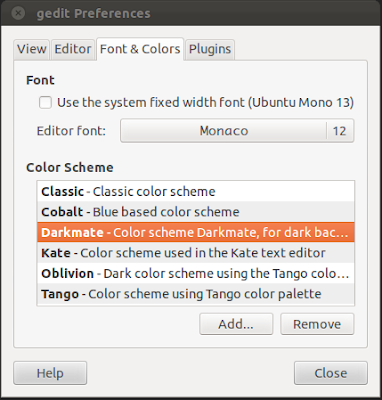
(4) Activating installed plugins from gedit -> Edit -> Preferences -> Plugins
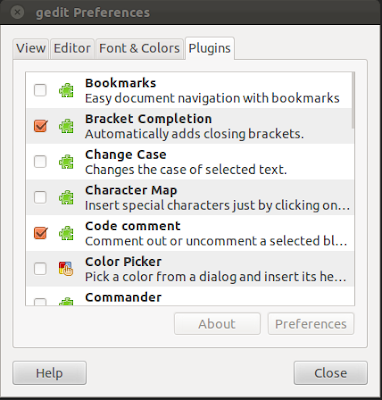
From this pane,we can enable following plugins as per our requirements :-
-Bracket Completion
-Code Comment
-File Browser Panel
-Snippets
-Word Completion, etc.
With these settings, your gedit now looks like Textmate :-

If you want to avoid the above steps, then we have also another option called Gmate. GMate is a collection of plugins, themes/styles and other improvements to get TextMate-like features in Gedit. The package will add some themes and plugins you can enable/disable from the Gedit preferences. To install GMate in Ubuntu, use the following commands:

In the upcoming posts, we will also try some other text editors available for Linux Ubuntu.
(1) Installing extra gedit plugins :-
$ sudo apt-get install gedit-plugins
(2) Installing Textmate 'Monaco' font
Download from http://www.gringod.com/wp-upload/software/Fonts/Monaco_Linux.ttf and execute below commands:

(3) Installing syntax color scheme darkmate.xml
Download the darkmate.xml file from http://grigio.org/files/darkmate.xml
From gedit, go to Edit -> Preferences -> Font & Colors. Then click Add button and locate the download file(darkmate.xml). Also select the Monaco font.

(4) Activating installed plugins from gedit -> Edit -> Preferences -> Plugins

From this pane,we can enable following plugins as per our requirements :-
-Bracket Completion
-Code Comment
-File Browser Panel
-Snippets
-Word Completion, etc.
With these settings, your gedit now looks like Textmate :-

If you want to avoid the above steps, then we have also another option called Gmate. GMate is a collection of plugins, themes/styles and other improvements to get TextMate-like features in Gedit. The package will add some themes and plugins you can enable/disable from the Gedit preferences. To install GMate in Ubuntu, use the following commands:

In the upcoming posts, we will also try some other text editors available for Linux Ubuntu.
Friday, February 3, 2012
Recording tests with JMeter
We had a requirement of load/performance testing in one of my earlier projects. Instead of using commercial and expensive Silk performer, we gave a try to open source Apache JMeter and it worked really well for the purpose that we were looking for.
The Apache JMeter is an open source software, a 100% pure Java application designed to load test functional behavior and measure performance.
There is an excellent step by step guide available @JMeter proxy Step-by-step for how to record tests with JMeter. The guide explains the steps for creating a test plan with JMeter's proxy. The proxy records the requests sent to the server.
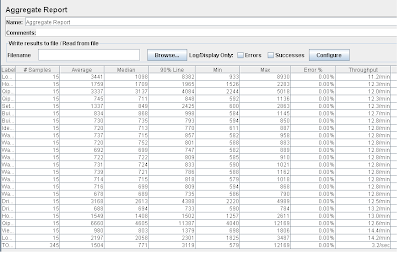
There are different kind of Listeners available for viewing load test results like Aggregate Report, Aggregate Graph, Summary Report, View Results Tree, Monitor Results, etc. Sharing one sample output of Aggregate Report :-
While setting up the load tests, we also need to take care of some config elements for more accurate results like HTTP Cookie Manager, HTTP Authorization Manager,HTTP Cache Manager, HTTP Request Defaults,HTTP Header Manager, etc.
I could not go through all the elements of test plan in depth due to time constraint, but one can go through these documentation links for stepping into more technical details :-
- JMeter User Manual
- Elements of a Test Plan
- Component Reference
The Apache JMeter is an open source software, a 100% pure Java application designed to load test functional behavior and measure performance.
There is an excellent step by step guide available @JMeter proxy Step-by-step for how to record tests with JMeter. The guide explains the steps for creating a test plan with JMeter's proxy. The proxy records the requests sent to the server.
There are different kind of Listeners available for viewing load test results like Aggregate Report, Aggregate Graph, Summary Report, View Results Tree, Monitor Results, etc. Sharing one sample output of Aggregate Report :-

While setting up the load tests, we also need to take care of some config elements for more accurate results like HTTP Cookie Manager, HTTP Authorization Manager,HTTP Cache Manager, HTTP Request Defaults,HTTP Header Manager, etc.
I could not go through all the elements of test plan in depth due to time constraint, but one can go through these documentation links for stepping into more technical details :-
- JMeter User Manual
- Elements of a Test Plan
- Component Reference
Thursday, February 2, 2012
Installing VM(with Ubuntu + RVM + Ruby + Rails) on my Windows 7 system
I wanted to give a try on my Windows 7 system to create and run Virtual Machine with Ubuntu OS. As my colleague Manohar rightly pointed out the reason @Ruby on Rails Development Platform in Enterprise behind this, I followed the instructions to install VMWare and Ubuntu on my Windows 7 laptop.
A. Download and Install VMWare Player which is free for personal non-commercial use.
B. Download 64-bit ISO of Ubuntu.
C. Create a New Virtual Machine for Ubuntu 64-bit using VMware Player. The steps are simple. It takes default 512 MB of RAM but I allocated 2 GB of RAM. It took me around 1 and half hour to install all the necessary files for ubuntu. So have a patience!
My host system configuration :-
Processor: Intel Core Dual i5 CPU, RAM: 6GB, 64-bit Operating System, Windows 7 Home Premium
Some issues that I faced and the corresponding resolution :-
(1) With Ubuntu 32-bit(recommended) ISO file download, the VMWare could not identify the 64-bit Ubuntu OS. So I downloaded 64-bit ISO file for Ubuntu 11.10 verison. With this file, the VMWare was able to detect 64-bit Ubuntu OS correctly.
(2) When I went ahead with the installation, I got 2 warnings/errors :-
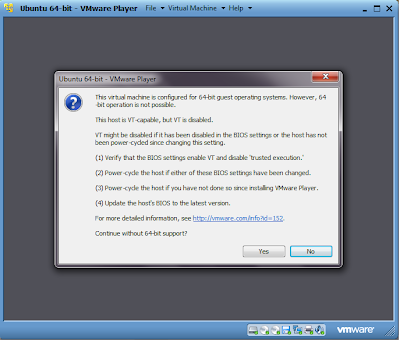
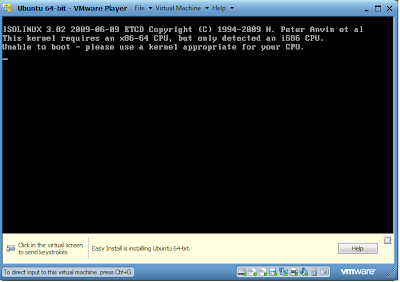
To run virtualization software and virtual machines, hardware virtualization technology should be enabled. I enabled Virtualization Technology (VT) in motherboard BIOS settings which is disabled by default and then restarted my machine. This resolved my issue and Ubuntu(64-bit) was then successfully installed on my VM.
I followed the steps mentioned @Ubuntu, Ruby, RVM, Rails, and You to install RVM, Ruby 1.9.3, Rails 3.1.3 and mysql2. The steps are self explanatory and straight forward to follow. Thanks to Ryan Bigg for this !
Now I am ready to try out some ruby/rails development on Ubuntu @ my home pc :-)
A. Download and Install VMWare Player which is free for personal non-commercial use.
B. Download 64-bit ISO of Ubuntu.
C. Create a New Virtual Machine for Ubuntu 64-bit using VMware Player. The steps are simple. It takes default 512 MB of RAM but I allocated 2 GB of RAM. It took me around 1 and half hour to install all the necessary files for ubuntu. So have a patience!
My host system configuration :-
Processor: Intel Core Dual i5 CPU, RAM: 6GB, 64-bit Operating System, Windows 7 Home Premium
Some issues that I faced and the corresponding resolution :-
(1) With Ubuntu 32-bit(recommended) ISO file download, the VMWare could not identify the 64-bit Ubuntu OS. So I downloaded 64-bit ISO file for Ubuntu 11.10 verison. With this file, the VMWare was able to detect 64-bit Ubuntu OS correctly.
(2) When I went ahead with the installation, I got 2 warnings/errors :-


To run virtualization software and virtual machines, hardware virtualization technology should be enabled. I enabled Virtualization Technology (VT) in motherboard BIOS settings which is disabled by default and then restarted my machine. This resolved my issue and Ubuntu(64-bit) was then successfully installed on my VM.
I followed the steps mentioned @Ubuntu, Ruby, RVM, Rails, and You to install RVM, Ruby 1.9.3, Rails 3.1.3 and mysql2. The steps are self explanatory and straight forward to follow. Thanks to Ryan Bigg for this !
Now I am ready to try out some ruby/rails development on Ubuntu @ my home pc :-)
Wednesday, February 1, 2012
Snaps from Sudhagad fort
Subscribe to:
Comments (Atom)


